Kia Cee'd: Audio / Audio Remote Control Repair procedures
| Inspection |
| Type A |
| 1. |
Check the audio remote control switch (A) for resistance between terminals
in each switch position.
[Audio]
[Call + Voice]
[Cruise + Flex]
[Trip]
|
| Type B |
| 1. |
Check the audio remote control switch (A) for resistance between connector
terminals in each switch position.
[Audio/ Bluetooth/ Drive mode]
[Trip + Cruise]
[Voice recognition]
[ECO/ Trip/ Drive mode]
[Audio/ Bluetooth/ Drive mode]
[Trip]
[Voice recogniton]
[ECO/ Trip/ Drive mode]
|
| Removal |
| Type A |
| 1. |
Disconnect the negative (-) battery terminal.
|
| 2. |
Remove the driver airbag module.
(Refer to Restraint - "Driver Airbag (DAB) Module and Clock Spring")
|
| 3. |
Remove the steering wheel.
(Refer to Steering System - "Steering Column and Shaft")
|
| 4. |
Remove the steering wheel cover (A) after loosening the screws.
|
| 5. |
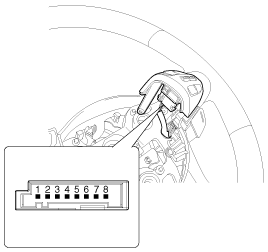
Disconnect the steering wheel remote control switch connector (A).
|
| 6. |
Disengage the steering wheel remote control switch assembly (A).
|
| 7. |
Remove the steering wheel remote control switch (A) and (B) after loosening
screws.
|
| Type B |
| 1. |
Disconnect the negative (-) battery terminal.
|
| 2. |
Remove the driver airbag module.
(Refer to the RT group)
|
| 3. |
Remove the steering wheel.
(Refer to the ST group - "Steering column & shaft")
|
| 4. |
Loosen the mounting screws from the rear steering wheel cover.
|
| 5. |
Separate the upper left steering wheel remote control switch (A) after
loosening the mounting screw.
|
| 6. |
Remove the upper left steering wheel remote control switch (A) after
disconnecting the connector.
|
| 1. |
Disconnect the negative (-) battery terminal.
|
| 2. |
Remove the driver airbag module.
(Refer to the RT group)
|
| 3. |
Remove the steering wheel.
(Refer to the ST group - "Steering column & shaft")
|
| 4. |
Loosen the mounting screws from the front steering wheel cover.
|
| 5. |
Remover the upper left steering wheel cover (A) after loosening the
mounting screws.
|
| 6. |
Separate the upper steering wheel remote control switch (A) after loosening
the mounting screw.
[LH]
[RH]
|
| 7. |
Remove the upper steering wheel remote control switch (A) after disconnecting
the connector.
[LH]
[RH]
|
| 8. |
Remove the steering wheel cover (A) after loosening the mounting screws
from the front steering wheel cover.
|
| 9. |
Remove the front steering wheel cover (B) after disconnecting the connector
(A).
|
| 10. |
Remove the lower steering wheel remote control switch (B) after disconnecting
the connector (A).
[LH]
[RH]
|
| Installation |
| Type A |
| 1. |
Reassemble the steering wheel remote control switch after connecting
the connector.
|
| 2. |
Reassemble the steering wheel.
|
| 3. |
Reassemble the driver airbag module.
|
| Type B |
| 1. |
Install the upper left steering wheel remote control switch and rear
steering wheel cover.
|
| 2. |
Install the steering wheel.
|
| 3. |
Reconnect the remote control switch connector and airbag connectors.
|
| 4. |
Install the driver airbag module.
|
| 5. |
Connect the negative (-) battery terminal.
|
| 1. |
Install the lower/ upper steering wheel remote control switch and front/
rear steering wheel cover.
|
| 2. |
Install the steering wheel.
|
| 3. |
Reconnect the remote control switch connector and airbag connectors.
|
| 4. |
Install the driver airbag module.
|
| 5. |
Connect the negative (-) battery terminal.
|
 Audio Remote Control Schematic diagrams
Circuit Diagram
Type A
1. Remote control switch(LH:
Audio)
2. Remote control switch(RH: Cruise+Flex)
3. Bluetooth hands free switch
...
 Multimedia Jack Schematic diagrams
Circuit Diagram
No
Terminal Description
Condition
Specified Condition
1
USB /iPod power
...
Other information:
Kia Cee'd JD Owners Manual: Cargo area cover
(3 Door and 5 Door)
Use the cover to hide items stored in the
cargo area.
The cargo area cover will be lifted when
the tailgate is opened. Disconnect the
strap (1) from holder if you want to return
the cover to original position. To remove
the cargo area cover completely, lift the
cover to a 43-degree an ...
Kia Cee'd JD Service Manual: BJ Boot Components and components location
Components
1. BJ
assembly
2. BJ circlip
3. BJ boot band
4. BJ boot
5. Dynamic
damper band
6. Dynamic damper
7. Shaft
8. TJ boot band
9. TJ
boot
10. Spider assembly
11. Retainer ring
12. TJ housing
...


