Kia Cee'd: Trunk Trim / Repair procedures
| • |
Put on gloves to protect your hands.
|
|
| • |
Use a plastic panel removal tool to remove interior trim pieces
to protect from marring the surface.
|
| • |
Take care not to bend or scratch the trim and panels.
|
|
| 1. |
Remove the luggage floor net (A).
|
| 2. |
Remove the luggage floor box cover (B).
|
| 3. |
After loosening the mounting screws, then remove the luggage floor box
trim (C).
|
| 4. |
Install in the reverse order of removal.
| •
|
Replace any damaged clips.
|
|
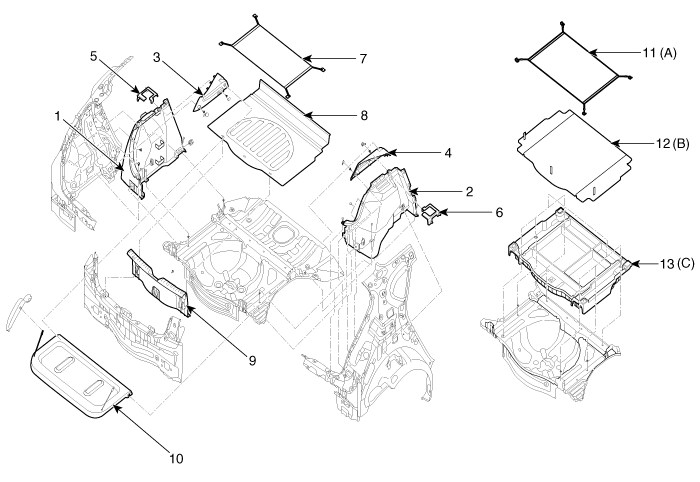
1. Luggage side trim
[LH]
2. Luggage side trim [RH]
3. Rear shelf side trim [LH]
4. Rear shelf side trim [RH]
5. Rear seat belt bracket [LH]
|
6. Rear seat belt bracket
[RH]
7. Luggage net
8. Luggage covering board
9. Rear transverse trim
10. Covering shelf
|
11. Luggage floor net
12. Luggage floor box cover
13. Luggage floor box trim
|
|
[3Door]
| • |
Use a plastic panel removal tool to remove interior trim pieces
to protect from marring the surface.
|
| • |
Take care not to bend or scratch the trim and panels.
|
| • |
Put on gloves to protect your hands.
|
|
| 1. |
Remove the luggage floor net (A).
|
| 2. |
Remove the luggage floor box cover (B).
|
| 3. |
After loosening the mounting screws, then remove the luggage floor box
trim (C).
|
| 4. |
Installation is the reverse of removal.
| •
|
Replace any damaged clips.
|
|

1. Luggage side trim
[LH]
2. Luggage side trim [RH]
3. Rear shelf side trim [LH]
4. Rear shelf side trim [RH]
5. Rear seat belt bracket [LH]
6. Rear seat belt bracket [RH]
7. Luggage net
|
8. Luggage covering board
9. Rear transverse trim
10. Covering shelf
11. Tail gate side trim
12. Luggage floor net
13. Luggage floor box cover
14. Luggage floor box trim
|
|
Other information:
Kia Cee'd JD Owners Manual: Air conditioning
Kia Air Conditioning Systems are filled
with environmentally friendly refrigerant*.
1. Start the engine. Push the air conditioning
button.
2. Set the mode to the position.
3. Set the air intake control to the outside
air or recirculated air position.
4. Adjust the fan speed control and te ...
Kia Cee'd JD Owners Manual: ISG system malfunction
The system may not operate when:
The ISG related sensors or system error
occurs.
The following will happen:
The yellow AUTO STOP ()
indicator
on the instrument cluster will stay
on after blinking for 5 seconds.
The light on the ISG OFF button will
illuminate.
✽ NOTICE
...


 Trunk Trim
 Windshield Glass